By James Booth
What is depth of field? I often wondered this myself. Early in my photo "career," I was often told that I needed to work on my depth of field. I didn't even know what it was. I was learning all this photography stuff pretty much on my own. Finally, I figured out what the term means. Put simply, depth of field is the range of sharpness from the nearest object to the farthest.
"Depth of field is the range of sharpness from the nearest object to the farthest."
A closer look
So how do we control depth of field? The aperture, the iris inside the lens, controls depth of field. Just like the iris in our eyes, the aperture controls depth of field by either increasing or decreasing the amount of light allowed into the lens. Each stop on the aperture decreases the amount of light allowed into the lens by half, known as stopping down, or increases it by double. So that from f/5.6 to f/8, the light is cut in half.
With the aperture wide open, the maximum amount of light is allowed into the lens. In most cases this will result in a flat, washed-out image, depending on the lighting circumstances of course. Figure A shows an image with the aperture wide open. Notice the central object is the only thing in focus.
FIGURE A
A wide-open aperture yields no depth of field. (click for larger image)
In Figure B, the aperture is set at the halfway mark. Depth of field is increased a bit, sharpening the rear object slightly, but the foreground object is still blurred.
FIGURE B
Stopping down the lens increases the depth of field. (click for larger image)
If the aperture is stopped all the way down, letting in a minimum of light, you will in most cases achieve maximum depth of field, but the required shutter speed will be so slow that any movement or jarring of the camera or subject will result in blurring.
This is definitely a consideration with an SLR camera, particularly the larger ones that use medium format. The aperture is stopped down all the way in Figure C, giving a sharp image at all ranges, but I'm amazed something didn't blur just from the mirror in the camera snapping up as the picture was taken.
FIGURE C
Minimum aperture yields maximum depth of field. (click for larger image)
Getting it right
The goal is to find the happy medium where you will get the desired depth of field with the shutter speed you need or want to use. Figure D was exposed at the setting recommended by the flash meter, which in this case happened to be one stop from wide-open, giving optimal exposure.
FIGURE D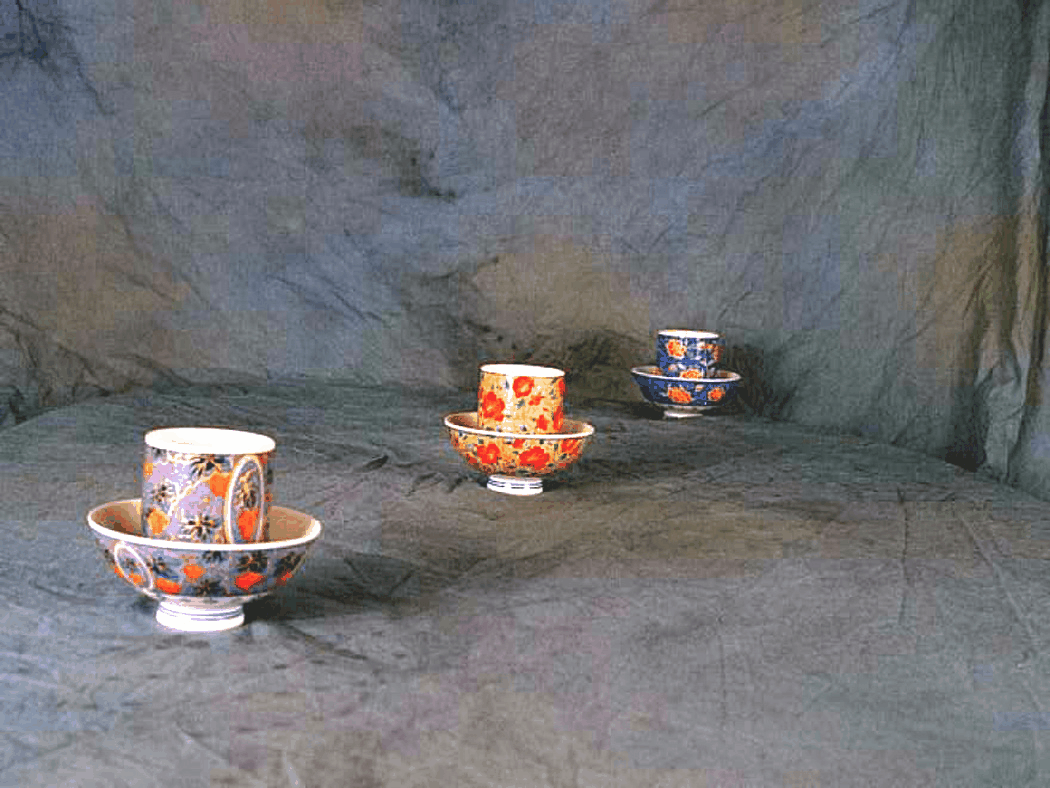
Metering the shot will give perfect exposure. (click for larger image)
Maximum depth of field isn't always desirable. There may be instances where you want to intentionally blur foreground or background objects, so stopping the lens down all the way isn't always the answer to appropriate depth of field. And yes, you can do that in Photoshop, but hand-blurring an image is a lot more work than setting your depth of field right in the first place.
Many of today's automatic cameras will take care of the appropriate aperture and shutter speed for you. But what if you don't have an automatic camera or want manual control over the depth of field?
A light meter or flash meter can help you get the right aperture setting. With either of these, you set the dial to the speed (ASA/ISO) of the film you're using and measure either the light reflecting from the object you're photographing, or the light falling on it. The meter will then give you an exposure setting for optimal depth of field. The use of light meters is a topic in and of itself, so I won't go into a lot of detail about their use here.
Another method is to use an internal exposure meter. Many cameras have an exposure meter built into them and you can use this to get your exposure right. Using your camera's depth of field preview, provided it has one, adjust the aperture to get the depth of field you want. Then activate your internal exposure meter, usually by pressing the shutter release half-way down. The internal meter will tell you if your shot will be over or under exposed. Just adjust your shutter speed until the exposure meter is in the optimal range.
A point of note here... This method will not work if you're using a flash, because the exposure meter is measuring the amount of light reflecting from the object at the time of the reading. This will change when your flash goes off of course, so this method is for available light photography only.
What if you're using flash and don't have a flash meter? A handy method for approximating aperture setting when using flash without a flash meter is by use of the guide number system. Guide numbers are another topic that bear their own discussion, so I'll just touch on them briefly (they'll be discussed in more depth later this month).
By knowing your flash's guide number for the speed of your film, and the distance the light will travel to your subject, you can calculate the appropriate aperture setting to use. You merely divide the guide number by the distance in feet and use the f-stop closest to the result.
In conclusion
Knowing what depth of field is and how to control it will allow you to get the exposure you want. If you know how to achieve the proper range of focus between your subject, foreground, and background, your images will look a lot better and you'll be much more satisfied with your work. You won't always want the perfect exposure though. The optimal balance of focus between the foreground and background isn't always desirable. Having a solid handle on how depth of field works will allow to get those specialty shots you desire. Good luck and good shooting.
James Booth is a self-taught PC and Palm device user that dabbles in graphics and photography. He can be reached at lizardworks@mchsi.com.