By David Gewirtz
In the past two weeks, we discussed how you can overcome various kinds of lens distortion, both using a powerful add-on filter as well as some of Photoshop's built-in tools. This week, we're going to do something different: we're going to purposely distort one image to make it fit on another.
Our goal is simple: we want to put the Connected Photographer logo on a jacket, making it look like it was silk screened onto the jacket originally. This technique, which makes use of a technique called displacement maps, is ideal for any situation where you want an image to conform to an irregular surface.
As a first step, let's start off with our irregular surface, in this case the jacket shown in Figure A.
FIGURE A
We want to put our logo on the surface of this jacket. (click for larger image)
We pulled this particular image out of our clip art collection because it provided a relatively large, single-color surface to work from. Although doable, it would have been far less likely that we'd want to put our logo over a cloth surface that was highly patterned.
Once you've chosen your destination image, you'll want to create a map from that image. What's going to happen is that we're going to create a file that, based on the darkness of an area of the image, will displace another image. This is actually far harder to explain than to tell you what to do, so I'm going to do exactly that.
Take the image that's your source image, and copy it to a new file, which will become your map file. Apply a low-level gaussian blur to the entire image. I used a setting of 2, and that was more than enough. Next, if you have access to channels (and, of course, Photoshop does), slightly shift the green channel up and to the left and the red channel down and to the right, causing poor color registration. You can see the result of these transformations in Figure B.
FIGURE B
Blur, then shift the red and green channels. (click for larger image)
Next, using the blurred and shifted image, select an area where the logo is going to go. You can see our selection in Figure C.
FIGURE C
Select the area where you're going to place the logo. (click for larger image)
Copy this area, paste it into a new file, and save it as a separate .PSD file. For ease of naming, I called it MAP.PSD, shown in Figure D.
FIGURE D
Here's the actual displacement map, saved to MAP.PSD.
Next, you'll want to grab the logo to be displaced. I pulled the Connected Photographer logo from our library, sized it down small enough to fit in the location I wanted, and rotated it slightly.
Now, it's time to use the very powerful Distort->Displace Filter. When you select this menu item, you'll get a small dialog box that'll ask you for a vertical and horizontal scale. You'll probably want to play with these numbers, but for our project, 5 and 5 fit very well. I left the rest of the settings at default. Once you click OK, the plug-in will ask you to choose a displacement map. Choose the MAP.PSD file.
Once you've done this, Photoshop will distort the logo appropriately to the displacement map, as shown in Figure E.
FIGURE E
Here's a distorted version of the Connected Photographer logo.
Finally, it's time to marry the logo with the jacket. This is a matter of using layers and masks, but I found that just by setting the logo's layer mode to darken and dropping the opacity a tad, we got a very nice effect. You can see the final logo jacket in Figure F.
FIGURE F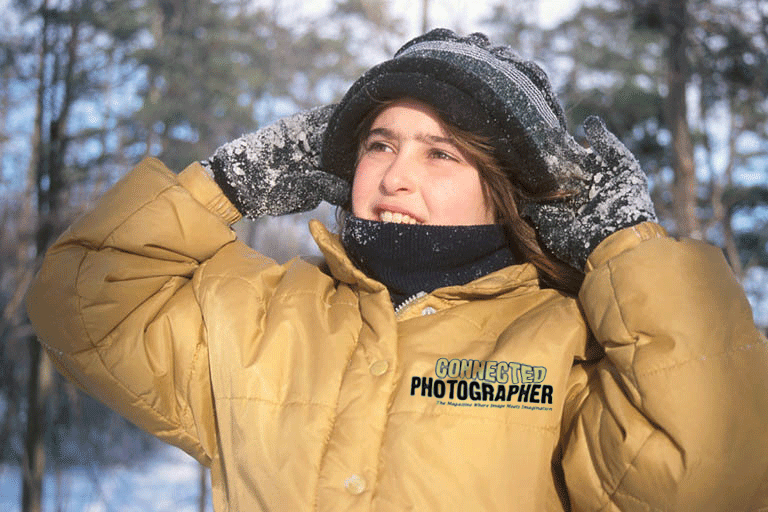
It's as if the logo came with the jacket. (click for larger image)
This is a very powerful technique, and it can be used for lots of other projects. You can see another, rough example of how this effect might work on the barn, shown in Figure G.
FIGURE G
We hit the side of this barn with our logo. (click for larger image)
In this example, I distorted the logo, and placed it as described above. I then used the eraser tool to remove small bits of the logo, to give it an even more weathered appearance.