By David Gewirtz
Once you've been a writer or an editor for a while, especially if you've lived with weekly deadlines, you develop an essential skill: the ability to come up with an article topic out of thin air.
This is one such article.
It's Sunday night, and my article is due tomorrow morning. I've already written a number of articles for the other magazines and, well, I'm running out of article-writing steam. So, having that essential coming up with a topic on the fly skill, I've come up with a topic: I'm going to talk about the pictures I took for another article.
In Computing Unplugged Magazine, this week, I did a review of the Pharos GPS navigator. You can read the article at http://www.computingunplugged.com/issues/issue200406/00001299001.html. As part of the review, I had to take a number of pictures of the various GPS components.
One of the nicer aspects of this article was that it was a review of a car-based device. That meant I could take pictures outside of the studio. In fact, I could take my pictures outside. I installed the GPS into the car, and then, using my Canon Digital Rebel SLR, I climbed into the driver's seat, set the camera on macro mode, and got to shooting.
Macro mode
Let's spend a few minutes on macro mode. This is a funny name, because the word macro means "big," and yet macro mode in a camera (officially, photomacrography), means you're taking pictures of small objects. This is another way of saying close-up photography. Most cameras are unable to focus if the subject is extremely close to the lens; by using a macro lens you can come in much closer.
Most better digital cameras come with a macro mode. If you're going to be taking close-up shots of products, you'll need it. For today's shoot, all my shots were of objects less than five inches big, so I used the macro mode on the camera.
Getting a sense of scale
One of my first images was of the GPS receiver itself. You can see my first photo of the receiver in Figure A. Definitely click the link for the larger image. It's important you see this picture in its full glory.
FIGURE A
A close-up shot of the GPS receiver has no sense of scale. (click for larger image)
If you clicked the link above for Figure A, you'll notice the GPS receiver looks great, but it looks like it's probably about 5 or 6 inches across. There was nothing to give it a sense of scale. After coming in from my shoot and looking at the pictures in Photoshop, I realized that, too. So I reshot it and used this next picture, Figure B, in the article.
FIGURE B
In my hand, it's much clearer just how small the receiver actually is. (click for larger image)
Without question, you now know how big the object is.
Using depth of field to spotlight one part of the product
In another photo, I wanted to spotlight a certain connector on a cable. The cable that connects the GPS to the Pocket PC had both a power feed and a data feed. I wanted to shoot this connector, and make it clear photographically, where I wanted the reader to pay the most attention. To do this, I used depth of field.
You'll recall, James Booth wrote about depth of field a few weeks ago (at http://www.connectedphotographer.com/issues/issue200405/00001284001.html). He defined depth of field as "The range of sharpness from the nearest object to the farthest."
In my picture of the cable connector, I wanted the connector part that was critical to the article to be crisp and in-focus, while I wanted the rest of the cable to be either out of focus or, at least, less in-focus.
Take a look at at Figure C to see how it came out. Be sure to click to see the larger image to fully appreciate the effect.
FIGURE C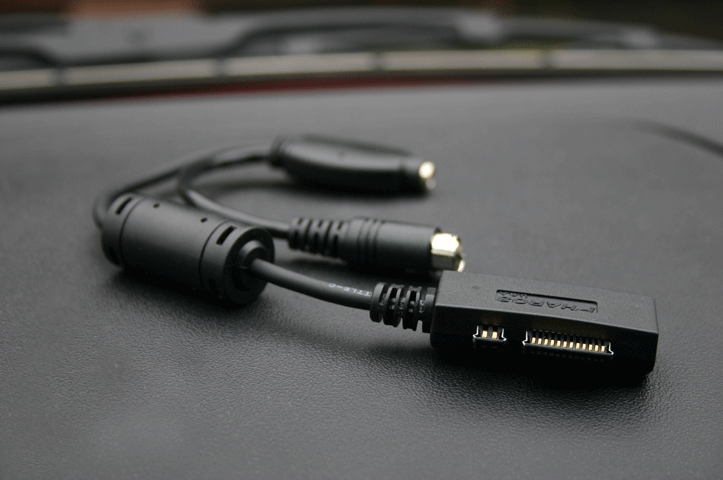
Depth of field allows us to highlight a certain part of the image. (click for larger image)
Because I'm using a digital SLR with all sorts of adjustments, I accomplished this by setting my f/stop to a relatively low number. With more automatic cameras, you can often accomplish the same thing by making sure the focus is locked on the part of the image you want to highlight.
Using available light with a flash
One of the really nice things about this particular shoot was that I could do most of it using available light. After all, I was shooting a bunch of objects on a dashboard, and I had sunlight (er, well...) coming in the windshield. Actually, I didn't have sunlight. It was raining. And as a result, I had somewhat overcast light that worked for some pictures, but proved a challenge for the picture of the Pocket PC itself.
There was too much ambient light for the Pocket PC's screen to show up clearly. So, I decided I'd use the flash on the camera to shoot the the screen, allowing it to be more visible. Unfortunately, that over-exposed other parts of the image. You can see four attempts at a good shot in Figure D.
FIGURE D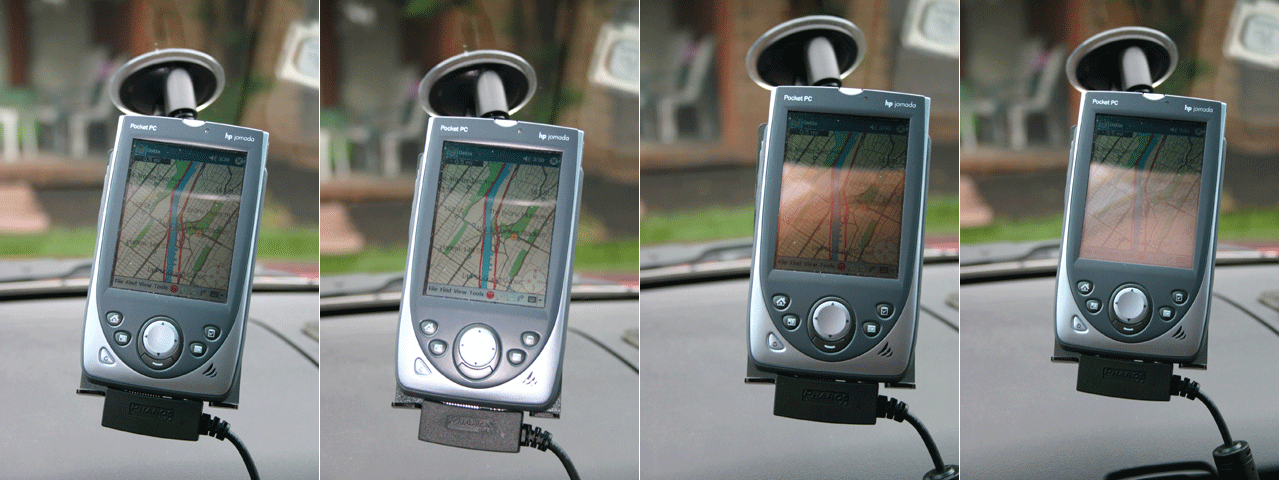
Here's four different attempts to get it right. (click for larger image)
Yes, we could have done a lot more with lighting and flash. But we weren't really going for a studio shot here. In fact, this picture was really intended to illustrate that the Pocket PC was attached to a mounting bracket on the windshield, and for that, any of the pictures would do.
And that, in fact, wraps up this little tour. Sometimes, it's important to keep the message you're trying to get across in mind. You can go overkill to get a perfectly photographed shot, but if you just need a picture of a bracket on a windshield, just take a picture of a bracket on a windshield and call it a day.
That's what I'm doing. See you next week.